本文系统整理了 Linux 系统中用户权限管理的核心知识,包括基本权限 UGO、ACL 权限以及特殊权限三大模块,配合大量实战案例,帮助读者全面掌握 Linux 权限管理。
为什么需要权限管理?
在日常生活中,权限无处不在:
- QQ 空间的红钻特权
- 游戏 VIP 会员特权
- 腾讯视频/爱奇艺会员特权
在 Linux 系统中,权限管理同样重要——它决定了哪个用户能以什么方式访问哪个文件。这就是权限的核心本质。
基本权限 UGO
权限对象
Linux 将权限对象分为三类:
| 对象 | 缩写 | 含义 |
|---|---|---|
| 属主 | u (user) | 文件的主人 |
| 属组 | g (group) | 文件所属的用户组 |
| 其他人 | o (other) | 除主人和组员之外的用户 |
| 所有人 | a (all) | u + g + o |
权限类型
| 权限 | 符号 | 数字 | 含义 |
|---|---|---|---|
| 读 | r | 4 | 查看文件内容 |
| 写 | w | 2 | 修改文件内容 |
| 执行 | x | 1 | 运行程序或脚本 |
查看权限
使用 ls -l 命令查看文件权限:
[root@localhost ~]# ls -l /root/1.txt
-rw-r--r--. 1 root root 179 5月 25 14:27 /root/1.txt
逐段解读:
-    rw-    r--    r--    .    1    root    root    179    5月 25 14:27    /root/1.txt
│     │      │      │     │    │     │       │       │         │              │
│     │      │      │     │    │     │       │       │         │              └─ 文件名和路径
│     │      │      │     │    │     │       │       │         └─ 最后修改时间
│     │      │      │     │    │     │       │       └─ 文件大小
│     │      │      │     │    │     │       └─ 文件属组
│     │      │      │     │    │     └─ 文件属主
│     │      │      │     │    └─ 硬链接数
│     │      │      │     └─ SELinux 扩展属性标记
│     │      │      └─ 其他人的权限
│     │      └─ 属组的权限
│     └─ 属主的权限
└─ 文件类型(- 普通文件,d 目录,l 链接等)
设置权限 —— chmod 命令
chmod(change mode)用于修改文件权限,有两种方式:
方式一:符号模式
chmod 对象(u/g/o/a) 赋值符(+/-/=) 权限类型(r/w/x) 文件/目录
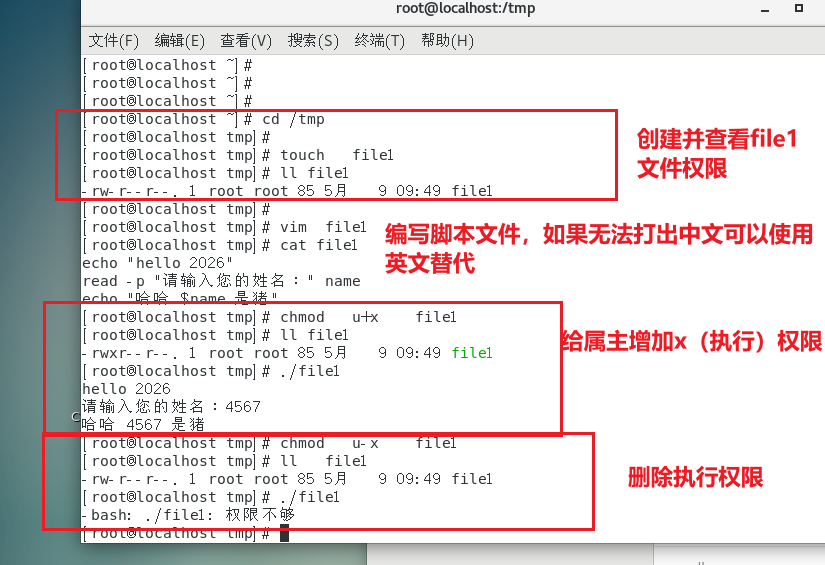
示例(注意观察ll file1后文件权限变化):
# 1. 创建文件并查看默认权限
[root@localhost ~]# cd  /tmp/
[root@localhost tmp]# touch file1
[root@localhost tmp]# ll   file1
-rw-r--r--. 1 root root 0 5月   9 09:43 file1

# 2. 编写一个脚本程序
[root@localhost tmp]# vim file1
echo "hello 2026"
read -p "请输入您的姓名:" name
echo "哈哈 $name 是猪"

# 3. 为属主添加执行权限
[root@localhost tmp]# chmod u+x file1
[root@localhost tmp]# ll file1
-rwxr--r--. 1 root root 85 5月   9 09:49 file1

# 4. 运行测试 —— 成功!
[root@localhost tmp]# ./file1
hello 2026
请输入您的姓名:4567
哈哈 4567 是猪

# 5. 去除权限后运行 —— 失败!
[root@localhost tmp]# chmod u-x file1
[root@localhost tmp]# ll   file1
-rw-r--r--. 1 root root 85 5月   9 09:49 file1

[root@localhost tmp]# ./file1
-bash: ./file1: 权限不够
更多符号模式练习:
chmod a=rwx file1    # 所有人 = 读写执行
chmod a=- file1      # 所有人 = 没有权限
chmod ug=rw,o=r file1 # 属主属组 = 读写,其他人 = 只读
方式二:数字模式
r=4 w=2 x=1
# 743 = 属主(4+2+1=rwx) 属组(4=r) 其他(3=r+x)
[root@localhost tmp]# ll   file1
-rw-r--r--. 1 root root 85 5月   9 09:49 file1
[root@localhost tmp]#
[root@localhost tmp]# chmod   743  file1
[root@localhost tmp]#
[root@localhost tmp]# ll   file1
-rwxr---wx. 1 root root 85 5月   9 09:49 file1
修改属主和属组 —— chown 命令
chown(change owner)用于更改文件的所有者:
# 语法
chown  用户名.组名  文件        # 同时修改属主和属组
chown  用户名  文件             # 只改属主
chown  .组名  文件              # 只改属组

# 示例
[root@localhost ~]# chown alice.hr file1    # 改属主、属组
[root@localhost ~]# chown alice file1       # 只改属主
[root@localhost ~]# chown .hr file1         # 只改属组

# -R 选项:递归修改目录中所有文件
[root@localhost ~]# chown -R alice.hr dir1/
chgrp(change group)专门用于修改文件所属组:
[root@localhost ~]# chgrp it file1           # 改文件属组
[root@localhost ~]# chgrp -R it dir1/        # 递归修改目录属组
综合实战案例
需求: 对文件 file10.txt 设置以下权限:
- 属主
user100:读写执行(7) - 属组
jishuzu(含 user200):只读(4) - 其他人:没有权限(0)
完整操作步骤:
# 1. 进入 /tmp 目录
[root@localhost tmp]# cd /tmp

# 2. 创建文件
[root@localhost tmp]# touch file10.txt
[root@localhost tmp]# ll file10.txt
-rw-r--r--. 1 root root 0 5月   9 10:13 file10.txt
# 默认权限:主人读写,组读,其他人读

# 3. 准备测试账号
[root@localhost tmp]# useradd user100
[root@localhost tmp]# useradd user200
[root@localhost tmp]# useradd user300
[root@localhost tmp]# groupadd jishuzu
[root@localhost tmp]# usermod -aG jishuzu user200
[root@localhost tmp]# id   user200
uid=6671(user200) gid=6672(user200) 组=6672(user200),6674(jishuzu)

# 4. 授予权限(740)
[root@localhost tmp]# chmod 740 file10.txt
[root@localhost tmp]# ll file10.txt
-rwxr-----. 1 root root 0 5月   9 10:13 file10.txt

# 5. 修改属主和属组
[root@localhost tmp]# chown user100.jishuzu file10.txt
[root@localhost tmp]# ll  file10.txt
-rwxr-----. 1 user100 jishuzu 0 5月   9 10:13 file10.txt
测试结果验证:
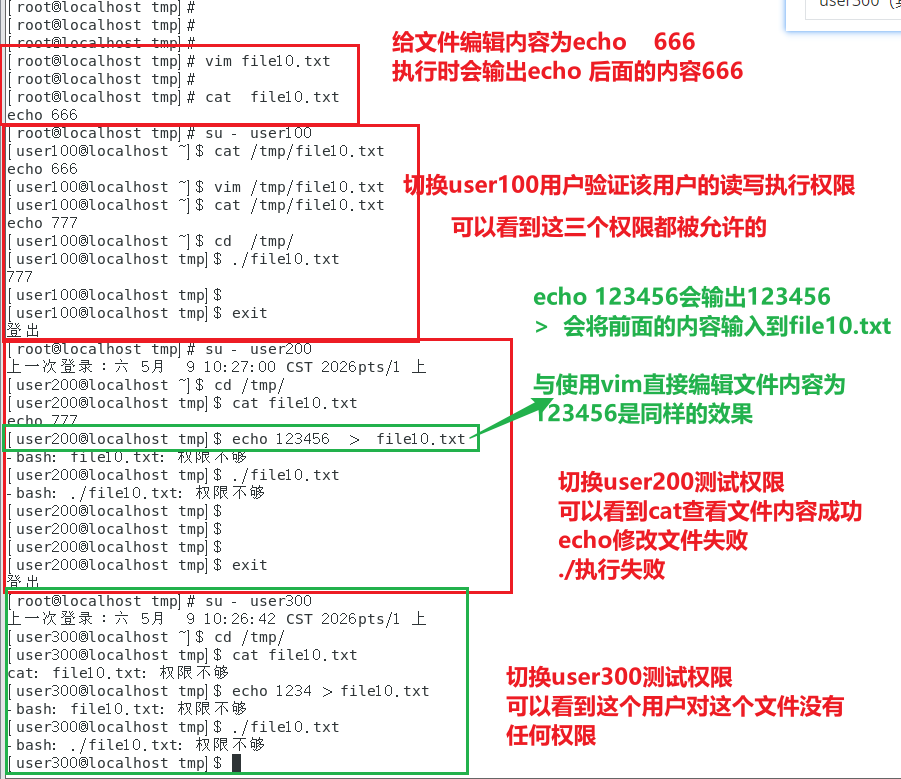
| 测试用户 | 读 | 写 | 执行 | 结果 |
|---|---|---|---|---|
| user100(属主) | ✅ | ✅ | ✅ | 全部成功 |
| user200(属组) | ✅ | ❌ | ❌ | 只能查看 |
| user300(其他人) | ❌ | ❌ | ❌ | 全部失败 |
我们给文件赋予了740的权限,user100和jishuzu分别作为该文件的属主属组,分别有着7(rwx)和4(x)的权限。user200加入了jishuzu就自然享受到了4(r)的权限,而user300几不属于该文件的属主,也不属于属组(jishuzu),就被划分到其他人的权限(0)中。
基本权限 ACL
UGO 的局限性
思考: 使用 chmod 能针对多个独立用户设置不同的文件权限吗?
user01  rwx  file1
user02  rw   file1
user03  r    file1
user04  rwx  file1
user05  rw   file1
答案是:不能! UGO 只能设置一个用户、一个组和其他人三种对象的权限。
ACL(Access Control List) 文件权限管理正是为此而生——它可以为不同的用户设置不同的基本权限。
ACL 语法
setfacl -m u:alice:rw /home/test.txt
# 命令 设置  用户:用户名:权限  文件对象
设置 ACL 权限
# 准备文件
[root@localhost ~]# touch /home/test.txt
[root@localhost ~]# ll   /home/test.txt
-rw-r--r--. 1 root root 0 5月  11 11:17 /home/test.txt

# 设置用户 alice 和 jack 的 ACL 权限
[root@localhost ~]# useradd  alice
[root@localhost ~]# useradd  jack
[root@localhost ~]# setfacl  -m  u:alice:rw   /home/test.txt
[root@localhost ~]# setfacl  -m  u:jack:-   /home/test.txt

# 设置其他人的权限
[root@localhost ~]# setfacl  -m  o::rw   /home/test.txt
查看 ACL 权限
[root@localhost ~]# getfacl /home/test.txt
getfacl: Removing leading '/' from absolute path names

# file: home/test.txt      ← 文件名
# owner: root              ← 属主:root
# group: root              ← 属组:root
user::rw-                  ← 用户(属主):rw-
user:alice:rw-             ← 用户 alice:rw-
user:jack:---              ← 用户 jack:---
group::r--                 ← 组(属组):r--
mask::rw-                  ← 掩码:rw-
other::rw-                 ← 其他人:rw-
删除 ACL 权限
# 增加 hr 组对 test.txt 的读取权限
[root@localhost ~]# setfacl   -m g:hr:r   /home/test.txt
[root@localhost ~]# getfacl   /home/test.txt
getfacl: Removing leading '/' from absolute path names
# file: home/test.txt
# owner: root
# group: root
user::rw-
user:alice:rw-
user:jack:---
group::r--
group:hr:r--
mask::rw-
other::rw-

# 删除 hr 组的 ACL 权限
[root@localhost ~]# setfacl   -x g:hr    /home/test.txt
[root@localhost ~]# getfacl   /home/test.txt
getfacl: Removing leading '/' from absolute path names
# file: home/test.txt
# owner: root
# group: root
user::rw-
user:alice:rw-
user:jack:---
group::r--
mask::rw-
other::rw-

# 删除所有 ACL 权限
[root@localhost ~]# setfacl   -b    /home/test.txt
[root@localhost ~]# getfacl   /home/test.txt
getfacl: Removing leading '/' from absolute path names
# file: home/test.txt
# owner: root
# group: root
user::rw-
group::r--
other::rw-
UGO 与 ACL 对比
| 特性 | UGO | ACL |
|---|---|---|
| 可设置的用户数 | 1 个用户 + 1 个组 | 多个独立用户 |
| 灵活性 | 低 | 高 |
| 命令 | chmod / chown | setfacl / getfacl |
| 适用场景 | 简单权限管理 | 精细权限管理 |
特殊权限
SUID(Set UID)
含义: 当一个程序设置了 SUID 权限后,普通用户执行该程序时会临时获得该程序属主的权限。
思考一个安全场景:
# root 用户查看自己创建的文件 —— 成功
root → /usr/bin/cat (root) → /root/file1.txt → ✅

# 普通用户 alice 查看 root 的文件 —— 失败
alice → /usr/bin/cat (alice) → /root/file1.txt → ❌ 权限不够
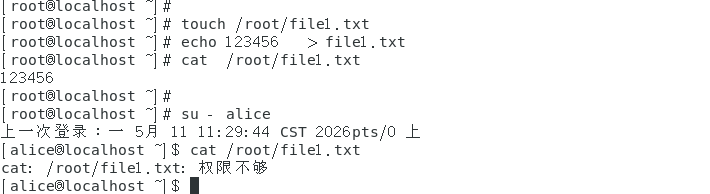
分析:root运行是超管的权限,普通用户运行时是普通用户的权限,一些文件是普通用户无法访问的。
SUID 提权演示:
# 1. 查看 cat 程序原始权限
[root@localhost ~]# ll   /usr/bin/cat
-rwxr-xr-x. 1 root root 54160 10月 31 2018 /usr/bin/cat

# 2. 为 cat 程序添加 SUID 权限
[root@localhost ~]# chmod u+s /usr/bin/cat
[root@localhost ~]# ll   /usr/bin/cat
-rwsr-xr-x. 1 root root 54160 10月 31 2018 /usr/bin/cat
#  ↑ 注意这里的 s 标志!

# 3. 普通用户运行 cat —— 暂时获得 root 权限!
[root@localhost ~]# su - alice
[alice@localhost ~]$ cat /root/file1.txt
123465
# 结果:普通用户成功看到了 root 的内容 ⚠️

# ⚠️ 重要:测试完成后必须删除 SUID 权限!
[root@localhost ~]# chmod   u-s  /usr/bin/cat
[root@localhost ~]# ll   /usr/bin/cat
-rwxr-xr-x. 1 root root 54160 10月 31 2018 /usr/bin/cat
⚠️ 安全提醒: SUID 权限非常强大,使用不当会带来严重的安全风险,请务必谨慎使用并及时撤销。
文件属性 chattr
用途: 用于锁定文件,防止被意外修改或删除。
# 1. 创建新文件,查看默认属性
[root@localhost ~]# touch file100
[root@localhost ~]# lsattr file100
-------------- file100

# 2. 添加不可修改属性(+i)
[root@localhost ~]# chattr +i file100

# 3. 查看属性
[root@localhost ~]# lsattr file100
----i--------- file100

# 4. 尝试删除 —— 失败!
[root@localhost ~]# rm -rf file100
rm: cannot remove 'file100': Operation not permitted

# 5. 还原属性
[root@localhost ~]# chattr -i file100
常用属性:
| 属性 | 描述 |
|---|---|
| a (append) | 允许在文件中进行追加操作 |
| A | 不允许更新文件的访问时间 |
| c (compressed) | 启用这个属性时,文件在磁盘上会自动压缩 |
| d (dump) | 不能使用 dump 命令备份文件 |
| D | 设置了文件夹的 D 属性时,更改会同步保存在磁盘上 |
| e (extent format) | 表明该文件使用磁盘上的块的映射扩展 |
| i (immutable) | 在文件上启用这个属性时,不能更改、重命名或者删除这个文件 |
| j (journaling) | 设置了这个属性时,文件的数据首先保存在日志中,然后再写入文件 |
| S (synchronous) | 设置了这个属性时,变更会同步保存到磁盘上 |
chattr 属性中可以使用的不同的选项
-R:递归地修改文件夹和子文件夹的属性-V:chattr 命令会输出带有版本信息的冗余信息-f:忽略大部分错误信息
问题及实战案例
设置文件属性(特别权限),针对所有用户,root是否会收到影响呢?
root用户作为Linux系统的超管,对文件系统可以说是掌握着绝对的控制权,同时也伴随着风险,例如误删误改等无法恢复的操作,下面案例来证明文件属性是否对root用户生效。
# 1. root 用户创建测试文件
[root@localhost ~]# touch test.txt
[root@localhost ~]# echo 111111 > test.txt

# 查看默认权限,方便与修改后对比
[root@localhost ~]# lsattr  test.txt
---------------- test.txt

# 2. 设置不可变属性
[root@localhost ~]# chattr  +i   test.txt
[root@localhost ~]# lsattr  test.txt
----i----------- test.txt

# 3. root 尝试修改/删除(全部失败)
[root@localhost ~]# echo 222222 > test.txt
bash: test.txt: 权限不够
[root@localhost ~]# rm -rf   test.txt
rm: 无法删除"test.txt": 不允许的操作
[root@localhost ~]# chmod  777  test.txt
chmod: 更改"test.txt" 的权限: 不允许的操作

# 4. root 唯一能做的:移除属性后再操作
[root@localhost ~]# chattr   -i  test.txt
[root@localhost ~]# rm -rf   test.txt
root 用户不受限制的唯一地方是:可以自由添加、修改、移除任何文件的 chattr 属性。
这意味着:
- chattr 属性是防误操作和限制普通用户的有效手段
- 但不能用来防御已经获得 root 权限的攻击者(攻击者可以直接
chattr -i移除属性) - 真正防御 root 级别的攻击需要结合其他机制(如文件系统只读挂载、IMA/EVM 完整性校验、安全模块如 AppArmor/SELinux)
进程掩码 umask
概述: 新建文件和目录的默认权限会受到 umask 的影响,umask 表示要减掉的权限。
# 查看当前 umask
[root@localhost ~]# umask
0022
# 目录:777 - 022 = 755 (rwxr-xr-x)
# 文件:666 - 022 = 644 (rw-r--r--)

# 在默认 umask 下创建文件和目录
[root@localhost ~]# touch file800
[root@localhost ~]# mkdir dir800
[root@localhost ~]# ll -d dir800 file800
drwxr-xr-x. 2 root root 6 5月  11 14:11 dir800/
-rw-r--r--. 1 root root 0 5月  11 14:11 file800
临时修改 umask:
# 修改 umask 为 000
[root@localhost ~]# umask 000
[root@localhost ~]# mkdir dir900
[root@localhost ~]# touch file900
[root@localhost ~]# ll -d dir900 file900
drwxrwxrwx. 2 root root 6 5月  11 14:12 dir900/
-rw-rw-rw-. 1 root root 0 5月  11 14:12 file900
# 目录:777 - 000 = 777 (rwxrwxrwx)
# 文件:666 - 000 = 666 (rw-rw-rw-)
📌 注意: umask 的修改是临时的,重启后恢复默认值。永久修改需要将 umask 写入
/etc/profile或~/.bashrc。
永久修改 umask:
# 1. 用root权限编辑/etc/profile
vim /etc/profile

# 2. 在文件**末尾**添加以下内容(以umask 022为例)
umask 000

# 3. 保存退出(vim中按Esc,输入:wq回车)

# 4. 让当前会话立即生效(无需重启)
source /etc/profile

# 5. 验证
umask
# 输出:0000
命令速查表
| 命令 | 用途 | 示例 |
|---|---|---|
chmod | 修改文件权限 | chmod 755 file.txt / chmod u+x file.txt |
chown | 修改文件属主/属组 | chown user.group file.txt |
chgrp | 修改文件属组 | chgrp group file.txt |
setfacl | 设置 ACL 权限 | setfacl -m u:alice:rw file.txt |
getfacl | 查看 ACL 权限 | getfacl file.txt |
lsattr | 查看文件属性 | lsattr file.txt |
chattr | 修改文件属性 | chattr +i file.txt |
umask | 查看/修改进程掩码 | umask 022 |
总结
Linux 权限管理是系统运维的核心技能之一。本文从三个层次进行了全面讲解:
基本权限 UGO —— 通过
chmod和chown命令管理属主、属组和其他人的读写执行权限,适用于大多数日常场景。ACL 权限 —— 通过
setfacl和getfacl实现更细粒度的权限控制,可以为不同的用户设置不同的权限。特殊权限 —— 包括 SUID 提权、chattr 文件锁定和 umask 默认权限掩码,用于满足更高级的安全管理需求。
掌握这些知识后,你将能够有效地管理 Linux 系统的安全边界,确保数据和文件得到妥善保护。